Kubernetes Secret Management: A Comprehensive Guide with AWS Secrets Manager

Secrets management is a critical aspect of managing any application or infrastructure. Therefore, secure storage and management of sensitive information are crucial in information security. Sensitive information includes passwords, API keys, and certificates, which must be kept confidential and protected from unauthorized access.
Kubernetes has become the go-to platform for managing modern applications in container orchestration. However, managing secrets in Kubernetes can be a challenging task, especially when it comes to integrating with cloud services like AWS.
This comprehensive guide will explore the best practices for managing secrets in Kubernetes and how to integrate with AWS Secrets Manager to enhance security and simplify management. Whether you’re a DevOps engineer, a Kubernetes administrator, or just getting started with container orchestration, this guide will provide a solid understanding of Kubernetes secret management and how to leverage AWS Secrets Manager to keep your applications and infrastructure secure.
What exactly are we trying to accomplish?
To enable Kubernetes to access AWS Secrets Manager, we’ll use the Secrets Manager CSI Driver. We’ll create a sample Nginx deployment and set some environment variables. The values for the environment variables will be retrieved from Secrets Manager, and the Secret Provider Class will automatically create a Kubernetes secret object using these values.
Next, we’ll set the environment variables in the Nginx deployment using the values stored in the secret object. This approach allows us to securely store and manage sensitive data while still making it accessible to our Kubernetes application. By using the Secrets Manager CSI Driver and the Secret Provider Class, we can simplify the process of accessing secrets stored in AWS Secrets Manager and improve the security of our Kubernetes applications.
Pre requisites
I assume following pre requisites have been already completed from your end.
- EKS cluster deployed and Running
- You have an IAM user with administrator permissions
- Kubectl is configured to work with your EKS cluster
- Helm v3 is installed in your local machine
- AWS CLI is configured to execute commands
Secrets Manager CSI driver Deployment
Before using the Secrets Manager CSI provider with Kubernetes, you must deploy the Secrets Manager CSI driver. The recommended approach is to use Helm to deploy the driver.
To deploy the CSI driver using Helm, run the following commands:
helm repo add secrets-store-csi-driver https://kubernetes-sigs.github.io/secrets-store-csi-driver/charts
helm install csi-secrets-store secrets-store-csi-driver/secrets-store-csi-driver --namespace kube-system --set syncSecret.enabled=true --set enableSecretRotation=true
When you deploy the Secrets Manager CSI driver using Helm, you can enable Kubernetes secrets sync and secret rotation. By default, these features are disabled, but you can enable them to automatically create the secret object in the Kubernetes cluster using the secrets manager secrets.
Enabling Kubernetes secrets sync and secret rotation allows you to automatically update the Kubernetes secret object with the latest secret value from AWS Secrets Manager, which helps to ensure that your Kubernetes applications always have access to the most up-to-date secret value.
If you wish further to customize the deployment of the Secrets Manager CSI driver, you can refer to the official documentation at https://secrets-store-csi-driver.sigs.k8s.io/getting-started/installation.html. This documentation provides detailed instructions on deploying and configuring the driver to suit your specific needs.
Verify the installation
kubectl get daemonsets -n kube-system -l app.kubernetes.io/instance=csi-secrets-storeSecrets Manager CSI driver Provider Deployment
To enable Kubernetes to retrieve secrets from AWS Secrets Manager, you must deploy the Secrets Manager CSI provider for AWS.
Simply can run the following commands to deploy the provider:
helm repo add aws-secrets-manager https://aws.github.io/secrets-store-csi-driver-provider-aws
helm install -n kube-system secrets-provider-aws aws-secrets-manager/secrets-store-csi-driver-provider-aws
If you like to customize the deployment, you want to check the official documentation: https://aws.github.io/secrets-store-csi-driver-provider-aws/
Verify the installation
kubectl get daemonsets -n kube-system -l app=secrets-store-csi-driver-provider-awsCreate a test Secret in Secrets Manager
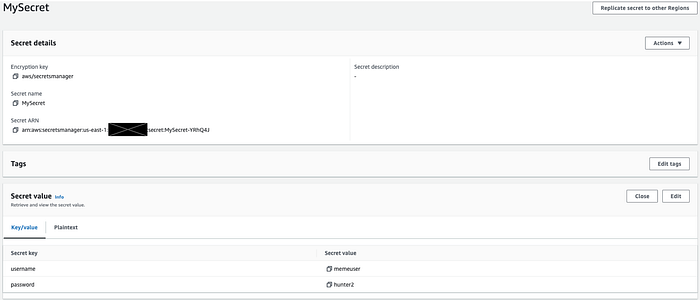
To test the integration between EKS and AWS Secrets Manager, you must create a secret in Secrets Manager within the same region as your EKS cluster. In this case, the region is us-east-1.
After creating the test secret, make note of the secret’s ARN or name, which will be used in the Secret Provider Class manifest. The ARN or name uniquely identifies the secret and allows the Kubernetes service account to retrieve the required secrets from AWS Secrets Manager.
By creating a test secret in Secrets Manager and noting its ARN or name, you can verify that EKS and AWS Secrets Manager integration is working as expected. This helps to ensure that your Kubernetes applications can securely access the data they need to operate.

Create IAM role for the service account
To allow the Kubernetes service account to retrieve secrets from AWS Secrets Manager, an IAM role with the necessary permissions must be created. To create an IAM role, navigate to the AWS console and search for the IAM service. Then, under IAM, click on Roles.
The trust entity type should be set to “web identity” when creating the role. Next, select the EKS cluster OIDC provider from the drop-down menu and specify the audience as “sts.amazonaws.com.”
This will allow the Kubernetes service account to assume the IAM role and access the required secrets from AWS Secrets Manager. By creating an IAM role with the appropriate permissions, you can ensure that Kubernetes applications can securely access the data they need to operate.

An IAM policy must be created with the necessary permissions to enable the Kubernetes service account to retrieve the secrets from AWS Secrets Manager. For example, you can use the following IAM policy as a template but replace the secret ARN with the ARN of your specific secret. The secret ARN can be found in the AWS Secrets Manager console.
{
    "Version": "2012-10-17",
    "Statement": [
        {
            "Effect": "Allow",
            "Action": [
                "secretsmanager:GetSecretValue",
                "secretsmanager:DescribeSecret"
            ],
            "Resource": [
                "<arn of your secret>"
            ]
        }
    ]
}
After creating the IAM role for the service account, it’s essential to note the IAM role ARN, as this will be used to annotate the service account. The IAM role ARN uniquely identifies the role and grants the service account the necessary permissions to access the secrets stored in AWS Secrets Manager.
By annotating the service account with the IAM role ARN, Kubernetes is granted permission to assume the role and retrieve the required secrets. This helps to ensure that sensitive information is kept private and secure while allowing Kubernetes applications to access the data they need to operate.
Create Service Account
apiVersion: v1
kind: ServiceAccount
metadata:
  name: secrets-manager-access-sa
  namespace: example # Your prefered namespace
  annotations:
    eks.amazonaws.com/role-arn: < Your IAM Role ARN >
A service account must be annotated with the IAM role ARN to allow pods to retrieve secrets from AWS Secrets Manager. By annotating the service account with the IAM role ARN, Kubernetes is granted permission to access the IAM role, which can then be used to retrieve secrets from AWS Secrets Manager.
Once the service account is annotated, the pods can securely access the Secrets Manager and retrieve the necessary secrets. This helps to ensure that sensitive information is kept private and secure while allowing Kubernetes applications to access the data they need to operate.
Create a secret provider class.
The Secret Provider Class custom resource definition (CRD) retrieves secrets from AWS Secrets Manager and creates Kubernetes Secret objects. Using the Secret Provider Class, Kubernetes users can easily and securely retrieve secrets stored in AWS Secrets Manager and use them in their applications.
The Secret Provider Class defines a Kubernetes object that maps to a secret stored in AWS Secrets Manager. Once the mapping is established, the Secret Provider Class retrieves the secret from AWS Secrets Manager and creates a Kubernetes Secret object, which the application can use. This process helps to simplify secret management and improve the security of Kubernetes applications.
apiVersion: secrets-store.csi.x-k8s.io/v1alpha1
kind: SecretProviderClass
metadata:
  name: aws-secrets
  namespace: example # Your prefered namespace
spec:
  provider: aws
  secretObjects:
  - secretName: k8s-secret
    type: Opaque
    data:
    - objectName: db_username
      key: username
    - objectName: db_password
      key: password
  parameters:
    objects: |
      - objectName: MySecret
        objectType: secretsmanager
        jmesPath:
          - path: username
            objectAlias: db_username
          - path: password
            objectAlias: db_password
Create Nginx Deployment
A simple Nginx deployment can be used to demonstrate how to mount secrets in a Kubernetes Deployment from AWS Secrets Manager. The deployment will use the Secret Provider Class to create a Kubernetes object that maps to a secret stored in AWS Secrets Manager. The Kubernetes object will then be annotated with the IAM role ARN and used to pass the database username and password as environment variables to the Nginx container.
The secrets will be mounted as a volume mount in the container to ensure the Nginx container can read the secret values. In addition, the mounted secrets will be available as a file in the container’s file system at /mnt/secrets-store. By mounting the secrets as a volume, the application can easily read and use the secret values as needed.
kind: Service
apiVersion: v1
metadata:
  name: nginx-deployment
  labels:
    app: nginx
  namespace: example # Your prefered namespace
spec:
  selector:
    app: nginx
  ports:
    - protocol: TCP
      port: 80
      targetPort: 80
---
apiVersion: apps/v1
kind: Deployment
metadata:
  name: nginx-deployment
  labels:
    app: nginx
  namespace: example # Your prefered namespace
spec:
  replicas: 1
  selector:
    matchLabels:
      app: nginx
  template:
    metadata:
      labels:
        app: nginx
    spec:
      serviceAccountName: secrets-manager-access-sa
      volumes:
      - name: secrets-store-inline
        csi:
          driver: secrets-store.csi.k8s.io
          readOnly: true
          volumeAttributes:
            secretProviderClass: aws-secrets
      containers:
      - name: nginx-deployment
        image: nginx
        env:
          - name: DB_USER
            valueFrom:
              secretKeyRef:
                name: k8s-secret
                key: username
          - name: DB_PASS
            valueFrom:
              secretKeyRef:
                name: k8s-secret
                key: password
        resources:
          requests:
            memory: "32Mi"
            cpu: "10m"
          limits:
            memory: "64Mi"
            cpu: "50m"
        ports:
        - containerPort: 80
        volumeMounts:
        - name: secrets-store-inline
          mountPath: "/mnt/secrets-store"
          readOnly: true
Conclusion
Overall, this approach simplifies accessing secrets stored in AWS Secrets Manager and improves the security of Kubernetes applications. Kubernetes users can easily and securely access the secrets they need to operate their applications by using the Secret Provider Class and mounting secrets as a volume.


